<html><head><title>Your title goes here</title></head><
body>xxxxxxxxxxxxxxxxxxxxxxxxxxxxxxxxxxx </body></html>
Let me explain you the two types of tag before we go further:
Example: <html>, <head>, <title>, <body>, <i> these types of tags requires closing.
Every container tag is closed by giving a slash sign ( / ) just before the name of the tag.
Example: </html>, </head>, </title>, </body>,</i> are the examples of closing tags.
Example: <br>, <img>, etc
<tag attribute="value">
The following example will make it clear - Suppose if you want to have background color of your web page as black then you will use "bgcolor" attribute within the <body> tag.
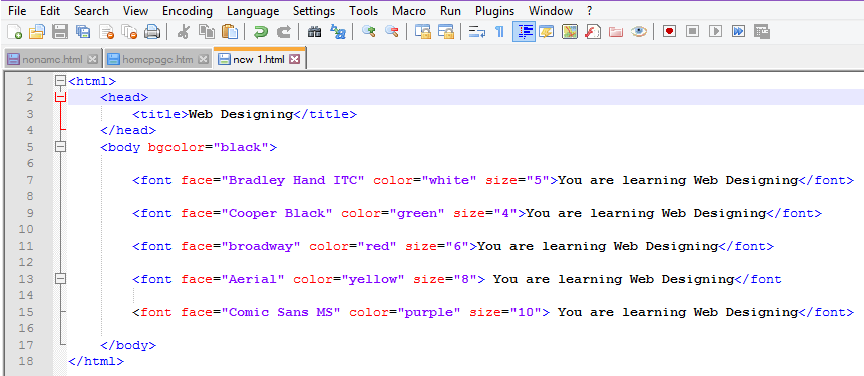
Open Notepad++ and type the following code -
<html><head><title>Web Designing</title></head>
<body bgcolor="black">
<font face="Bradley Hand ITC" color="white" size="5">You are learning Web Designing</font>
<font face="Cooper Black" color="green" size="4">You are learning Web Designing</font>
<font face="broadway" color="red" size="6">You are learning Web Designing</font>
<font face="Aerial" color="yellow" size="8"> You are learning Web Designing</font>
<font face="Comic Sans MS" color="purple" size="10"> You are learning Web Designing</font>
</body></html>
As you have already saved it with .html extension ( if not done then do it now ), you just need to click on "Save" option from "File" menu on the menu bar.
As you can see main tags have "light blue" color, contents that are displayed on web browsers have "black" color, attribute have "red" color while value of attributes have "purple" color. This is the main reason why we use Notepad++, you can easily distinguish all stuffs very easily.
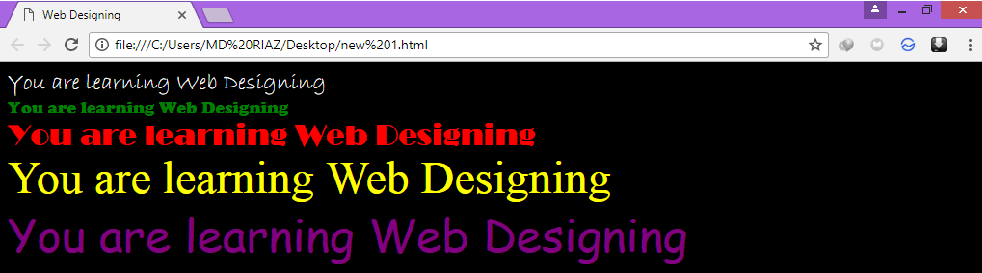
The following code could give this type of output -

As you see here that all the text are in written in one complete line, but you can change it by using <br> [break tag. Its a empty tag] or <p> [paragraph tag. Its a container tag].
You need to use it just where you want to break the line ( <br> ) or from where you want to start a new paragraph ( <p> ).
After you use <br> tag or <p> tag you will see the output like this:-
<font face="broadway" size="4" color="#FF0000">
Now you have learned how to assign size, color, face to your text in web pages. Now let us learn how to make text look BOLD, italic and underlined!
Example of <b> tag:-
<b>This text is displayed in bold<b>
Example of <i> tag:-
<i>This text is displayed in italic</i>
Example of <u> tag:-
<u>You are learning Web Designing</u>
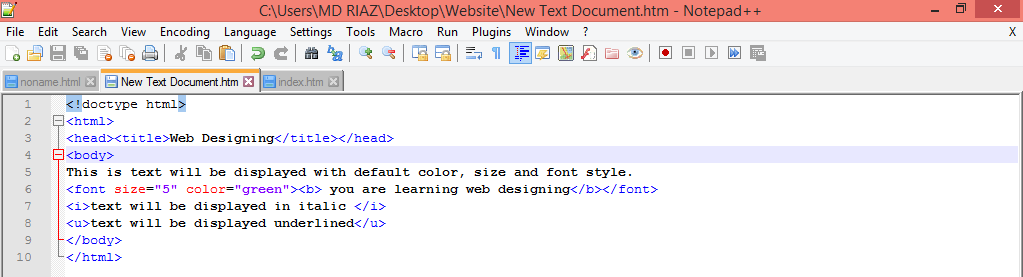
Here is how you will type it on the Notepad++
<html><head><title>Web Designing</title></head>
<body>
This is text will be displayed with default color, size and font style. <font size="5" color="green"><b> you are learning web designing</b></font>
<i>text will be displayed in italic </i>
<u>text will be displayed underlined</u>
</body>
</html>
If the opening pattern of tags are like this --- any tag A > any tag B > any tag C
then the closing pattern of tags should be like this --- any tag A < any tag B < any tag C
The grater sign in opening pattern of tags shows that "tag A" have be opened before "tag B" and "tag B" have been opened before "tag C"
And the less than sign in closing pattern of tags shows that "tag A" have been closed at last, "tag B" have been closed just after "tag C" while "tag C" has been closed at the first.
It might have got very confusing here. Don't worry I fill show you with an example -
Suppose here is the code--
<font><b><i>You are learning Web Designing</i></b></font>
as you can see the closing pattern of tags is just opposite of the opening pattern of the tags
similarly, if
<font size="6"><b><i><u>You are learning Web Designing </u></i></b></font>
here also the closing pattern of tags is just opposite the opening pattern of tags.
You should also know that use of attributes in any tags will not change this method. As here size attribute of font tag doesn't change the closing pattern.
The <b>, <i> and <u> tags which we saved earlier will give this output:-

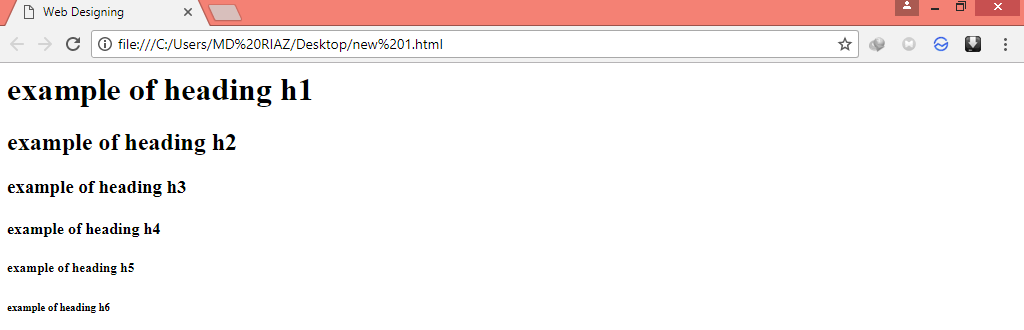
There are six levels of heading in H T M L. These are -
This is how you will use the heading tags in your web page -
<h1> example of heading h1</h1>
<h2> example of heading h2</h2>
<h3> example of heading h3</h3>
<h4> example of heading h4</h4>
write similar to his upto <h6> and you can even use font , bold, italic, underline tags to customize it more
The output will be like this:-
You learned the following things:-
Now go to page 4 to learn step 3.
|
|
How Many People Visit |
|